Let’s get real: When was the last time you gave your fridge a good deep cleaning? Keeping the fridge clean means you’re preventing the breeding of germs that can further cause diseases like food poisoning. It is recommended to do a deep clean every three to four months. And here are the steps to take to get your fridge some well-deserved TLC.
How to Properly Clean Your Fridge
Step 1: Empty the fridge
It is a good idea to schedule a cleaning day one or two days before you go grocery shopping or when you find yourself saying “There’s nothing to eat!” This is so your fridge is fairly empty and fewer things to take out. Unplug the fridge before you unload it. It is ideal to place the foods in a cooler until you’re ready to return them after cleaning. Discard food that has gone bad and expired. You can also use this as an opportunity to write down what is expiring soon and make your shopping list around those foods and sauces.
Step 2: Wash the drawers and shelves
Take out all the removable sections. You can wash the drawers and shelves with hot water and dish soap. Dry the shelves completely before putting them back later.
Step 3: Wipe Interior
It’s best to use mild or unscented cleaner for your fridge as food absorbs odors. A simple solution of two tablespoons of baking soda and one-quart hot water should do the job. Rinse with a damp cloth, then dry with a towel.
Step 4: Check the Drip Pan
Almost all fridges have drip pans below. Check your manual to see how to access it. Empty the pan if it’s full of water. Wipe the drip pan clean with warm soapy water. Scrub it with a rag to remove any buildup. For drip pans that are non-removable, wrap an absorbent cloth around the head of a long-handled brush; dip it in warm, soapy water, and clean the pan.
Step 5: Dust Coils
To keep your unit running efficiently, unplug it and use a coil brush or your vacuum to clean the condenser coils of dust and buildup. Do this at least every six months, especially if you have fur babies around.
Step 6: Don’t Forget the Outside
Wipe the top and exterior with a cloth dampened with mild soap and water. Give the areas around the handles extra treatment, as they are often smudged with fingerprints. Mind the door seal too, gunk might have built up there. For stainless steel makes, use commercial stainless steel spray and wipe in the direction of the grain; dry to prevent streaking.
Step 7: Putting Everything Back
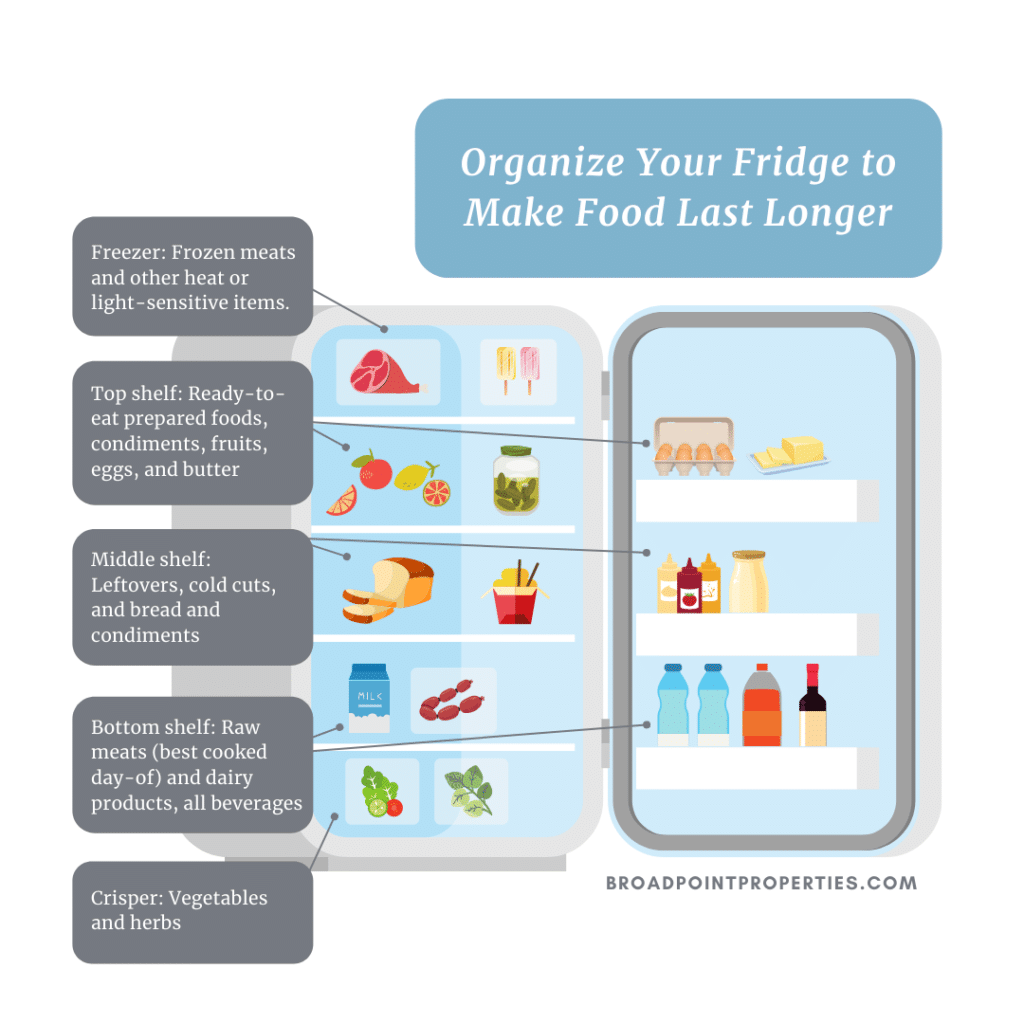
Put the shelves and drawers back in place. As you’re putting food items back in your fridge, try to do so in an organized fashion so that more of the food you buy actually gets eaten. The general rule is as follows:

Freezer: Frozen meats and other heat or light-sensitive items.
Top shelf: Ready-to-eat prepared foods, condiments, fruits, eggs, and butter
Middle shelf: Leftovers, cold cuts, and bread and condiments
Bottom shelf: Raw meats (best cooked day-of) and dairy products, all beverages
Crisper: Vegetables and herbs
Cleaning your refrigerator is simple but takes time. You also don’t need harsh cleaners to do so. For more housekeeping tips, feel free to browse through our blog.


